Adobe Express (formerly Adobe Spark) has become a go-to tool for anyone looking to create stunning visuals fast—whether it’s for social media, business promotions, school projects, or even printed materials. While it’s super user-friendly, mastering Adobe Express takes things to the next level, so here’s 7 tips for mastering Adobe Express.
Whether you’re a total beginner or just want to sharpen your design skills, here are some pro tips for getting the most out of Adobe Express—plus a step-by-step guide to set up your pages for print-ready PDFs.
1. Start with the right template
Adobe Express offers thousands of templates, but the key is picking one that suits your end goal. Whether it’s a flyer, Instagram post, business card, or brochure, use the search bar to narrow down by use-case and aesthetic. You can always tweak the size later.
2. Use the brand kit (even in the free version!)
While the full Brand Kit is a premium feature, free users can still manually add logos, choose consistent fonts, and set up a visual style. Save time by keeping a “brand reference” file to reuse across designs.
3. Play with layers and groups
Just like Photoshop-lite, Adobe Express lets you stack elements in layers. Click on elements and use the “Arrange” tool to move items forward or backward. Group items together for faster edits and perfect alignment.
4. Maximize free assets
There’s a goldmine of free stock photos, icons, and design assets inside Adobe Express. Use the Photos, Design Assets, and Shapes tabs to find high-quality visuals without leaving the editor.
5. Customize fonts and spacing
Typography can make or break a design. Don’t just settle for the default font – adjust size, letter spacing, line height, and alignment for a polished look. Pro tip: Use bold headers and keep body text clean and legible.
6. Use “Quick Actions” for speed
Need to remove a background, crop a video, or resize an image for another platform? The Quick Actions panel on the home screen lets you do all that with one click – no extra software needed.
7. Name and organise your projects
Stay organised by giving your projects clear names and using folders (especially if you’re creating designs for clients or campaigns). It’ll save you from endless scrolling later.
How to set up Adobe Express pages for print
If you’re designing something you plan to print—like a flyer, poster, menu, or business card—you’ll need to set up your page correctly. In this example we are going to set up a 6 page folded leaflet called a ‘C-fold leaflet’ like this one which can be ordered here:
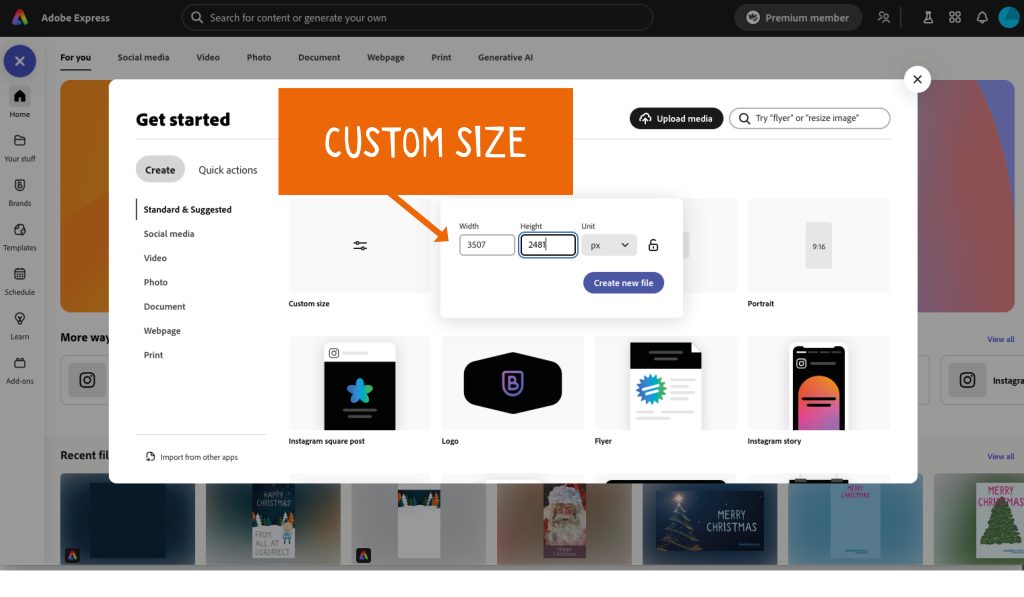
Step 1: Create a custom size
From the Adobe Express homepage:
Click the blue + button (Create New)
Choose “Custom Size Graphic”
Use pixels (px) for better control over resolution (300 px = 1 inch at print quality)
For example:
A4 size = 2481 × 3507 px
Step 2: Design for Print
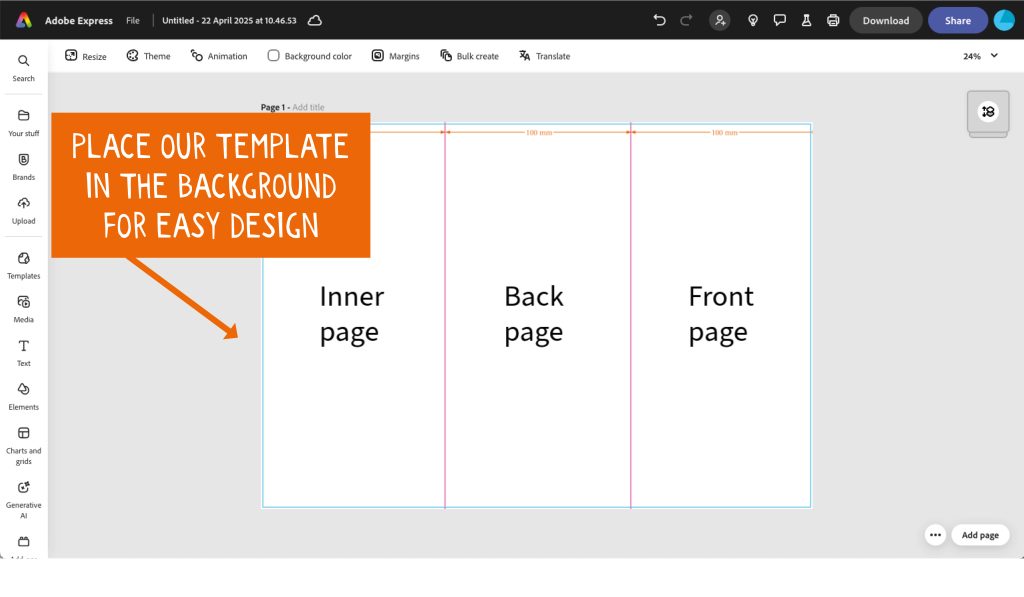
Folds: To ensure the flyer folds neatly, we recommend dividing the page into 97mm, 100mm and 100mm. This way, the inner page folds into the outer folds without any buckling. We have designed a template that you can add to your document for making sure that your elements fit inside each section. To do this, download the files below. In Adobe Express click upload, navigate to the file, insert into the document and fill the page with the image then right click and lock the image. It’s very important that you unlock this image and delete it before you prepare the final PDF for printing.
Margins: Leave 3mm margins around edges for safety.
Fonts: Use 10pt or larger for body text to stay legible.
Images: Use high-resolution (300 DPI) images to avoid blurring in print.
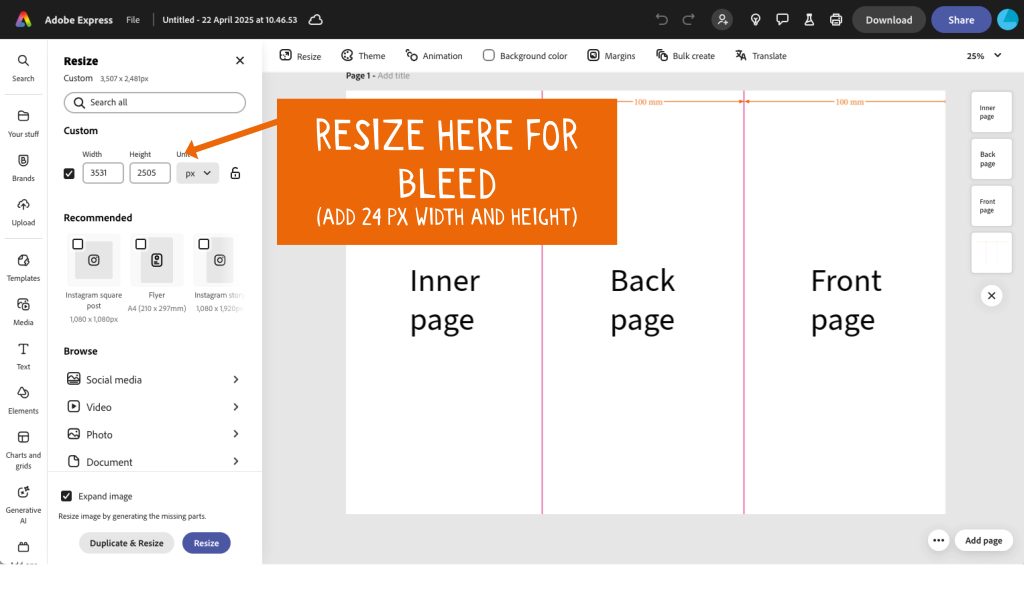
Step 3: Add Bleed (If Needed)
Adobe Express doesn’t have a built-in bleed setting, but you can:
Add an extra 24 px to the width and height of the document (extend your design to the edge of the canvas).
Avoid putting important text too close to the edge.
Step 4: Download as PDF (Print)
When your design is ready:
Click Download in the top right.
Choose “PDF (Print)” for high-resolution output.
This format is designed for sharp printing and includes quality enhancements like flattened images and embedded fonts.
With these simple steps, you can confidently create print-ready PDFs using Adobe Express, then you can upload here, and wait for your beautiful documents to arrive.
Please take a look at our blog Adobe Express versus Canva to find out the pros and cons of using either Adobe Express or Canva for your page designs.